Friday, 30 October 2015

Organising the location


Over the holidays, Alex contacted Gemma Rolandi about access to her home for our film.


Gemma's schedule is a priority as we will be filming in her home outside of college hours and must consider her family. 

In a conversation with our actor's mum, Isobel, she had said that her available days would be Tuesday and Friday. This is a problem as Gemma has said that her best day would be Thursday. We are currently waiting a reply from Gemma on possibly using her home on Tuesday.

We will update this blog post accordingly!

Actor confirmation

For our short film, we will be focusing around three characters. 2 older roles (young adolescent/teenagers) and a child.

For the child role, we contacted our friend Beth Gray's mum for access to Beth's sister. Isobel is an 11-year-old girl with a mature approach, and is eager to act in our film. Here is a screenshot of a conversation that took place between Alex and Laura (Isobel's mum):

We then began thinking about the older characters. Due to commitments with work, and limited time, we decided that working with adults would be difficult. If we had more time to create the film, this would be something we would consider. Instead, we contacted our friend Kierah Rathborn to play the female role. We're excited to be working with Kierah due to her involvement the Tulley's Shock-tober event over the past two years, and experience in Performing Arts within college. After vaguely bringing up the possibilities of working together in college, we messaged her during the holidays to get a confirmation. Here is a screenshot of the conversation between Alex and Kierah:

Wednesday, 21 October 2015

Potential Title?

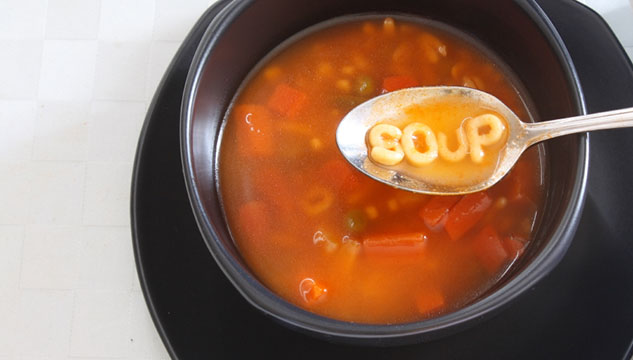
We found this image on Google and we liked the idea of having it as our title sequence.
We would do this through a bird's eye view CU of the woman ladling up soup, in which the letters could appear, this could be achieved through animation or literally buying alphabet soup and visually setting up the scene ourselves. Meg had the idea of repeating the same shot at the end but replacing it with the eyeball, which would give it a shock effect.  

Tuesday, 20 October 2015

Underwater Experiments

We began our growing list of 'things to do' by doing an underwater experiment. We used the Sanyo VPC-WH1EX camera to achieve this. The quality of the film was very high, and would work nicely for our titles. We are excited to use this in the real thing!


We experimented using watercolour paints, acrylic paints, and generally looking at what the world looks like underwater.

This is what we have learned:
  • Water colours look very thin underwater and don't look like blood due to it's colour
  • Acrylics didn't look like blood either, although we did like the murkiness of water
  • We have yet to find fake blood that looks appropriate.

Monday, 19 October 2015

Aspect Ratio Research

Out of personal taste, I was interested in filming with an extremely wide aspect ratio. I took my time to research the credentials for different films types.
 
  
Our past two films have filmed with a standard ratio (see screenshot of 'ELIJAH') and looked like generic YouTube video, so I looked into what our other options were.
Simply searching 'aspect ratio' gave me this chart of basic film/video. We are usually in the yellow area, shooting at a ratio of 16:9 - this is for standard to high definition films.

Going to extreme lengths and looking at 4.00:1 ratio would be unrealistic to our budget. This film type is very uncommon, and we would need to have a particularly high definition camera.
The purple section (Ultra-Panavision 70) would also be unrealistic as it is commonly used for extremely long shots of landscapes.

This is where I feel the the Anamorphic widescreen would be effective. It would still be very dramatic, but not got the added screen ratio for the sake of having it. Here is an example of Anamorphic widescreen in practice: 
One concern that was bought up when considering this editing technique was the attention to framing. We will need to crop the top and bottom of our film to achieve this cinematography effect. Whoever is behind the camera at the time will need to consider this so nothing important is cut out in post-production.

Setting Planning

When looking for a setting, we thought that we should use a large open space to move around in. We asked a friend at college; Gemma Rolandi, if we could use her kitchen. Here's a screenshot of Alex and Gemma's conversation:


And here's a close up on the pictures of her kitchen:
We have been given very strict instructions (by Gemma, the homeowner, and our teachers) to not ruin anything. We are filming in an unfamiliar area and hoping to use fake blood.
Our main concern is staining. To avoid this, we will do a risk assessment of the kitchen. We will also create fake blood and find out what is water soluble, what is easy to clean up and what looks most realistic.

Tuesday, 13 October 2015

To do list - what we need to experiement with:

When planning our short, we realised that there will be some minor set backs that we will need to prepare for prior to filming. Those highlighted in green will be easiest, amber being slightly harder, and red being challenging.

Underwater Camera
In one of the beginning scenes, we are hoping to use an underwater camera to show the woman washing her hands. We are also considering to use this set-up for our titles. As we have no experience in underwater filming, we will need to look into experimenting.

Pumpkins Prep
To give the impression that we are filming during Halloween, we need to have pumpkin props to show the conventions of the holiday. To give it a darker 'edge', we are aiming to carve pumpkins a few days prior to filming. The goal is to have them slightly rot. We have experience in pumpkin carving, but it is important to have our designs sorted.

Find offal, soup and alphabet spaghetti
Our film is based around food, so it is vital to make the various meat selections and soups to look like genuine, edible food. Part of this process will be to find a butcher's market that will be willing to sell us offal. Cooking soup and alphabet spaghetti will be easy, but we will need to create the word 'soup' using spaghetti.

Outside lighting
One thing we really didn't like about our foundation portfolio film opening was our usage of outside lighting. We went in with no knowledge on it, and wished for the best. We have already began this experiment and created  a blog post on how lighting can affect mood. Our next step would be to look at repeating this experiment outside and how we would light a dark street on Halloween night.

Foleys
In order to make our short as realistic as possible, we want to create thrilling foleys that intensifies what is being shown on screen. This includes: high speed blender noises, meat tenderizer noises, squelching offal movement and making the most out of silence. We would be able to create these foleys on the day of filming, and if anything goes wrong, we would be able to correct them in post-production.

Make-up (blood)
We aim to create a blooding setting while the woman is prepping the food, so fake blood will be necessary. However, as we are aiming to film in an unfamiliar setting, we must ensure we don't make a mess. Our greatest fear is staining - obviously we will avoid getting fake blood on the walls and floor. We will have to look at creating a solution that is water-soluble and easy to clean up.

Eyeball in soup
The eyeball in the soup is the big reveal at the end of the film, so we have to make sure it looks believable and realistic. We are aiming to buy a fake eyeball, OR, see if there are any animal remains that look human. This is our biggest challenge, as we really want to have the eyeball turn around in the liquid/soup for the final scene.

Individual blog posts to all of these will follow over the next month - we will aim to hyperlink each of them in this particular post!

FINAL SYNOPSIS


The plot of our story will switch between two sides using cross cutting editing between a Father and Son/Daughter trick or treating, and an anonymous person preparing food, however all the conventions will lead the audience to believe that anonymous person is preparing a human body. The person, which will later be revealed to be the mother will be preparing the ‘food’ which we will show through restricted narration using closed camera shots, using close ups, and angling the camera in order to maintain the anonymity of the character preparing the food.  


We will open with a CU shot of the child’s shoes, panning up to show them in a Halloween costume,  They will be  accompanied by their parent and we will use close up shots of hands ringing doorbells and treats being poured into trick or treat baskets. We will use a repeated shot of doors opening onto the two characters and/or, ringing door bells, to show their movement throughout the night. Transitions between the rapid successions of repeated shots will be either straight cuts or possibly FADE to black, dissolves.


This will then be contrasted with a dark setting of a kitchen, using low key lighting.  Using restricted narration we will show a character preparing a meal with what the audience will be led to believe, are human bodily remains. This will be done with a lot of close up camera work and angling of the camera, and action and enigma codes, such as CU’s of knives cutting on a chopping board, offal lying around the setting surfaces, use of a meat tenderizer and intense BCU Facial expressions, copious amounts of blood, washing hands to clean off the blood and possibly use of a blender, with red liquid (blood?) We will focus primarily on camera work and sound to set the scene. The setting itself will be dark and looking macabre, dark lighting and sinister props, such as jars filled with dark coloured liquid and carved pumpkins. We will use low key lighting, which will be used to highlight the side of the face, showing gory shots of the meat.


The gory scene will be contrasted in comparison to the trick or treaters, through the dialogue, such as “You’ll have to eat dinner before any of those sweets!”

Gradually the audience will start making a link between the two settings and the relationship between the characters, as the film would build into a climax as the three characters would cross over. We would audibly hear voices and the door opening in the kitchen setting, the dialogue of the two trick or treaters crossing over into the kitchen setting such as “Oh I thought fruit was only given in the movies!” the use of the innocent conversation into the kitchen setting with leave the audience asking questions as to why the pair are now in this setting.


We will then use a reveal of the character from the kitchen, as the mother of the child, who will then be shown holding the ‘dinner’ she has prepared. The audience will now see the woman has prepared a dinner for the three, shown as a completely normal dinner, with the husband remarking “Oh this kitchen is a mess in here!”


Image result for real eyeballWe will then show the three sat round the dinner table eating a starter of soup with the main also sat on the table, leaving a sense of normality in the family. We will use a final shock reveal as the audience assume all is normal, a CU of a soup bowl will be shown, with an eyeball floating up will be used to impact the audience and leave it as an enigma and the audience asking questions, is it real?

Tuesday, 6 October 2015

Experimenting with Lighting

As our group has such conflicting ideas, we have decided to not work as a full group for this lesson. Instead, Alex and Holly have looked into lighting and how it can affect a character's mood/settings. Using our own knowledge of lighting from previous lessons (e.g. importance of lowkey/highkey lighting, softboxes etc.), we have devised a small run down of where we were successful and unsuccessful with our lighting. I have also made some notes on how we can improve when it comes to filming our short.

Starting with low key lighting:

  • This shot only used one light
  • The actor is placed in front of the light to highlight their shoulders/back of their head.
  • This can create a very tense, mysterious mood.
  • We can improve this shot by removing all other lighting (we had used a dark corridor for these experiments and had to keep a light on outside of the doors)
  • The light can also be seen reflecting on the wall to the left, and could light up our actor.
  • I can see this being successful in a Thriller. 
  • This shot only used one light
  • The light is positioned to the right of the actor, and scaled up slightly taller than the actor.
  • The light is quite harsh on the actors face, and really brings out the shadows beneath the eyes, lips and nose.
  • As the light is so harsh, the contrast can be lost here. This is something to consider if we decide to use this in our film.
  • Again, this would fit the conventions of a Thriller.
  • This shot only used one light
  • The light is positioned in front and below the actors face.
  • The lights the whole face up this time, but shows harsh shadows around the actor's eyes, nose and mouth again.
  • This shot is great at casting a menacing shadow behind the actor
  • We could control the shadows with a second light, but would consider using a filter to soften the glare.
  • This shot only used one light 
  • The actor stands in front of the light, and a light stand is used above the actor's head.
  • This casts a harsh light on the top of the actors head, and highlights one half of the body (predominantly the actor's shoulder)
  • There is just enough light to see the actor's facial expressions as they look up
  • However, a very heavy shadow would be cast if the actor looked straight on
  • This shot would be perfect for a reveal.
  • This also lights up the setting a bit more  

  • This shot used two lights
  • The actor is seated, with one light on the right, above their head.
  • The other light is used at slightly lower than eye-level  to remove shadows.
  • The actor's head is slightly tilted, so half of the face is still covered.
  • This shot comes across as very emotive as it highlights the character's facial expressions.
  • The background is also lit, only casting a minor shadow to the left of the actor. 


 Examples of high key lighting:
  • This shot used two lights
  • The actor is positioned in front of one light at eye level, the other is used to highlight the background. 
  • When it comes to filming, we will be sure to remove any lights from the frame. This was one of our errors!
  • The whole face is lit, with no shadows hiding the actor's face. A soft shadow is cast behind the actor. This would be great for conversations at night (e.g. impersonating a streetlamp, car headlights etc.)
  • This shot used one light
  • This shot is similar to the shot before, but the actor is positioned slightly further away from the main light in front.
  • The back light has also been switched off to create a sharper shadow behind the actor.
  • The framing is also better in this shot as we were critiqued last year for chopping off foreheads during production.


One of our main problems in our Foundation Portfolio was lighting, we were uneducated on it and went in blindly. We set ourselves a big goal in our last task by filming in the dark, and the results weren't that impressive. 
Personally, this is something I want to perfect by the end of the year. 

I have also watched a very helpful video on the basics of Cinematography; the section on night filming will come in handy for further experimenting. Click here to watch the video!

I also plan on watching this 'Quick Tips: DIY Lighting Kit' tutorial. If we were to find ourselves in a situation that required lighting, some DIY tips would come in handy. Click here to watch that video!

HELP US VOTE FOR OUR FILM